f

Labels

Showing posts with label Workouts. Show all posts

Thursday, July 11, 2019

10 EXERCISES TO KILL BACK FAT YOUR BODY CAN’T WAIT TO TRY

When it comes to exercising, it probably would be fair to say that many of us are guilty of focusing mainly on the front of the body since that’s what we see in the mirror. But back exercises are just as important as any other and in this article, you will find how to get strong and toned back.


1. Arm circles

Hold your arms up parallel to the floor and start circling, squeezing the shoulder blades. Circle forward for 45 seconds, rest for 15 seconds and then circle backward for another 45 seconds.

2. Bent over row

Bend over, roll the shoulders back, and bring your arms up while squeezing the shoulder blades. You may use dumbbells or do this without any weights. Keep your back straight as it is very important not to round your back.

Repeat for 45 seconds. Then rest for 15 seconds.

3. Bent over pulses

This exercise is very similar to the bent over row but this time, you need to pulse your arms 5 times before dropping them down.

Repeat for 45 seconds. Then rest for 15 seconds.

4. Superman fly

Lie face down with your arms and legs extended. Keeping your arms and legs straight, squeeze your back muscles, and lift the arms and legs up as high as possible. Focus on keeping the neck relaxed in a neutral position. If you experience neck pain, you’re most likely putting too much pressure on it.

This exercise is great for your lower back.

Repeat for 45 seconds. Then rest for 15 seconds.

5. Wind fly

Lie face down on your stomach and keep hands next to your body, close to your thighs. Slightly lift your chest and shoulders off the floor. Squeeze your shoulder blades and upper back muscles together. As an addition to the superman fly, this exercise is great for not only the lower back muscles but for the oblique muscles, as well.

Repeat for 45 seconds. Then rest for 15 seconds.

6. Superman hold

Start exactly like you would the superman fly, but once you get your arms and legs in the lifted position, hold it for 45 seconds or longer. Don’t forget to breathe. Challenge yourself and try to hold as long as you can. This is a very effective exercise for your back, abs, and glutes.

Rest for 15 seconds.

7. Windmill

Stand with your feet slightly wider than shoulder-width apart and keep your legs straight. Rotate your torso from side to side, reaching the opposite foot — your opposite arm should point toward the ceiling. Aim for as much rotation as you can. Make sure that you are keeping your back straight and your abs engaged.

Repeat for 45 seconds. Then rest for 15 seconds.

8. Back lift

Lie with your face down and place your fingers behind your ears and your elbows on the mat. Squeezing the lower back muscles, lift your upper torso as high as possible, hold it for a few seconds, then lower it back down. If you experience some neck pain, you are not doing it correctly. Make sure that you are lifting the upper torso and not just your head.

Repeat for 45 seconds. Then rest for 15 seconds.

9. Back squeeze

Start from the same position as the back lift. Lift your upper torso and reach both your arms straight out in front of you. Squeeze the shoulder blades as you bend your arms to the sides, keeping them close to your body. Squeeze your back muscles and shoulder blades as much as possible.

This is a very good exercise for the upper part of your back.

Repeat for 45 seconds. Then rest for 15 seconds.

10. Swimmers

Sometimes it’s also called a superman fly but we are using the alternative name to differ from the exercise mentioned above. Lie face down on your stomach and extend your arms and legs, engage your abs, and lift your chest off the floor. Lift your right arm and left leg and then change.

Repeat for 45 seconds. Then rest for 15 seconds.

Bonus: Why are back exercises so important?

Back exercises have a bigger impact on our health and appearance than you may realize. Scientists came up with some cool names for different parts of the back and that’s why you should do a number of exercises to cover all the zones. The bottom line is — strong and toned back muscles will help you keep a good posture and get rid of that annoying back fat.

Back exercises also keep your spine healthy. There’s only one trick to it — the technique must be perfect. If you are new to the fitness world, you should take a few lessons to learn how to do everything correctly.

Friday, June 28, 2019

Fat Burning and Weight Loss Exercises for Women

If you’re looking to set your internal systems to fat-burning-furnace mode and absolutely melt body fat as quickly as possible, the following exercises are your secret sauce for robust weight loss and sculpting an improved, lean physique.


For maximal impact integrate each fat-burning exercise into your existing workout schedule, or create a circuit out of all 12 to form one fat-torching full-body workout.

1. Lunges:

This is a very effective exercise to get your thighs into great shape. Push into your heel and return to your starting position. This exercise is very effective for the thigh muscles. It elevates the heart rate and help to burn fat faster.

How to do:
  • Stand with your feet slightly apart and ex your abdominal muscles.
  • Step forward with your left leg, while your torso stays straight.
  • Bend your knee until it forms a 90-degree angle

2. Hip Dips

How to do:
  • Get in a forearm plank position and roll to one side in forearm side plank position.
  • After you get your balance, place your free hand on your hip and start dipping your lower hip to the oor up and down.
  • Do 15 reps on each side.

3. Dumbbell Side Bend

How to do:
  • Grab a dumbbell in each hand and stand with your feet hip width apart.
  • Bend from your waist to your left side as low as you can and at the same time sweep your arms in an arch overhead as you bend.
  • Straighten up and repeat on the other side.
  • Keep alternating and do 20 reps

4. Tummy Tuck

How to do:
  • Stand with your feet apart and abs tight.
  • Bend forward with your legs straight and walk forward with your hands until you are in a plank position.
  • Bend your right knee and try to touch it to your right elbow.
  • Now take that knee to the center and touch your chest.
  • Now take it to the left and touch it to your left elbow
  • Straighten back the leg and repeat with your left leg.
  • Keep alternating and do 15 reps.

5. Deadlifts

How to do:
  • Start with your back slightly forward and your knees bent.
  • Holding a barbell or dumbbells near your shins, come up with straight shoulders and a straight back.
  • Remember to lift your barbell close to your body and end right below the waist.
  • REPS: 4 sets, 10 to 12 reps each.

6. Squats

How to do:
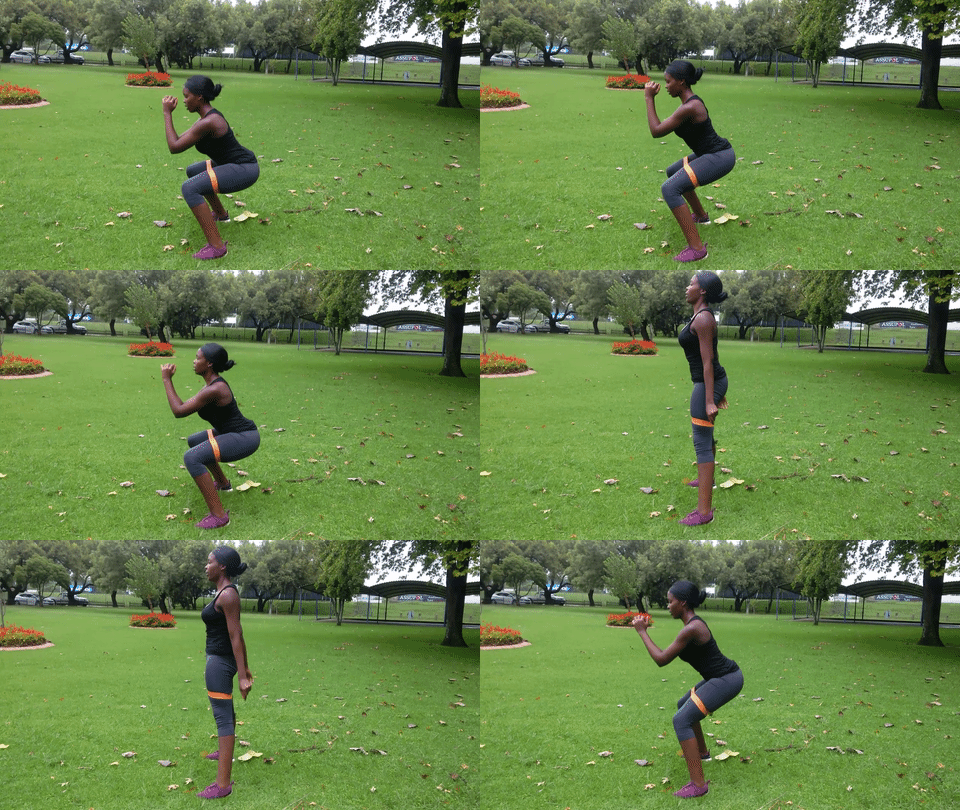
  • Starting with bent knees and holding weights or a medicine ball, move your butt down into a seated position and go back up into a standing position. For this move, Ryan says it’s important to use some type of weight to actually burn fat.
  • REPS: 4 sets, 12 to 15 reps each.

7. Flat Bench Press On a Ball

How to do:
  • Balance on your back on a stability ball and bring your arms towards the center using dumbbells.
  • Ryan says if you’re having diculty balancing, try using a smaller weight.
  • REPS: 4 sets, 10 to 12 reps each.

8. Bicycle Crunches

How to do:
  • Lay at on your back with your hands behind your head.
  • Raise your legs so that they are 1–2 feet (0.3–0.6 m) above the ground.
  • Bend your left knee and bring it toward your head and twist your body so that your right elbow meets your left knee.
  • Now, straighten your left leg and do the same thing on the other side, touching your right knee to your left elbow.
  • Do 15-20 of these for one rep, increasing reps as you get stronger.

9. Russian Twists

How to do:
  • Sit on the ground with your back straight and your feet extended out in front of you. Bend your knees slightly and keep your feet at on the oor.
  • Bend backward slightly so that your back is at a little less than 90 degrees. Hold a 5-10-pound dumbbell in your hands and twist your body toward the left, lowering the dumbbell halfway to the oor.
  • Bring your body back to the original position, and then do the same thing on the right side. Repeat 20-25 times.

10. Side Planks

How to do:
  • Start off in a side plank position with your right elbow supporting you, and your left arm resting on your hips. Make sure that your body is totally straight, and hold the position for 30-60 seconds.
  • Repeat on the other side with your left elbow supporting you. You can ip op a few times between sides.

11. Jump Rope:

Jump rope is not just a fun exercise, it also has great tness benets for grown-ups as well. Jumping rope workout is an excellent total-body exercise to condition and strengthen the heart, tone the arms, legs and core. It’s also a great cardio to shed some extra calories and fat.

How to do:
  • To start, grab the handles with a comfortable grip.
  • Turn the rope by turning your wrists in circular.
  • Swing the rope over your head and jump as it passes your feet.
  • You don’t have to jump high – just enough to clear the rope.
  • Land evenly on both feet. Continue for one minute, then rest for one minute.

12. Wall Sit:

Wall sit or wall squat is a simple body-weight exercise that will test the strength and endurance of your lower body. But be warned. This exercise works a little different than the typical body weight squats since you’re holding your body in a static position for a certain period of time.

How to do:
  • To start, lean against the wall with your feet hip-width apart planted rmly on the ground.
  • Your feet also should be about 2 feet away from the wall.Now brace your abs and slowly slide down the wall with your back pressed against the wall until your legs are bent at the 90 degree angle.
  • This angle is very crucial because if your thighs are not parallel to the ground, your leg muscles will not get a workout.
  • Knees should be directly above your ankles and your back should be touching the wall at all times.
  • Hold this position for 20-60 seconds.

Wednesday, August 1, 2018

5 MOVES TO SCULPT A TIGHT AND TONED BUM

Whether you’re wearing a bikini, skinny jeans, or a little black dress, a sculpted booty is always the perfect accessory. And while there are many effective ways to tighten and tone your rear, you can really do so with this five-move formula that never fails to deliver fast results.

This better-butt circuit includes plyometrics, sprints, and simple strength exercises to get your heart rate up (burn fat!) and build lean muscle.


How This Routine Works: Do 1 set of 10 reps for each exercise, unless otherwise noted, with little or no rest between moves. After you’ve finished the last exercise, repeat the entire circuit 2 more times. Start by doing this workout twice a week, then increase it to three or four times a week. Get Going. Good Luck.

1. STRAIGHT LEG DUMBBELL DEADLIFT

This is a favorite exercise for a lot of fitness trainers because it dramatically strengthens and tones the glutes and hamstrings. For best fat-burning results, be sure to choose a weight that challenges your muscles. If you feel like you could easily do more than 10 reps, you need to use heavier dumbbells.

How to do it: Grab a pair of dumbbells with an overhand grip and hold them at arm’s length in front of your thighs. Stand with your feet hip-width apart and your knees slightly bent. Without changing the bend in your knees, bend at your hips and lower your torso until it’s almost parallel to the floor (keep the weights as close to your body as possible). Pause, then return to standing. Your back should stay naturally arched during the entire movement.

Do 10 reps with a challenging weight (15 to 40lbs depending on your fitness ability).

2. SPRINT, BACK PEDDLE, SPRINT

Research shows that high-intensity interval training (like these sprints) can help your body burn more fat in the 24 hours after your workout than you would after steady-state cardio.

How to do it: Start in a lunge position with your back at a 45-degree angle, weight shifted forward. Drive through your big toe to take bounding steps forward. After about 10 yards, shift your hips back to quickly reverse the movement. Back peddle to the starting position (10 yards), keeping your chest up the entire time. Quickly shift your hips forward to repeat the forward movement again. That’s one rep. Do 10 reps of sprint-back, peddle, sprint total.

3. MARCHING BRIDGE

This is a simple yet super-effective exercise to target your glutes and hamstrings without risk of your quads taking over. By lifting your leg while holding the bridge, you’ll also activate your entire core.

How to do it: Lie faceup with your knees bent and your feet flat on the floor, arms by your sides. Raise your hips so your body forms a straight line from your shoulders to your knees. Lift one knee to your chest, lower back to the start, and lift your other knee to your chest. Continue alternating until you’ve completed 10 reps on each leg, holding your hips high during the entire movement.

 4. JUMP SQUATS

This high-intensity exercise raises metabolic rate, meaning you’ll keep burning fat for hours after your workout is over. The movement targets your glutes, hamstrings, and quads.

How to do it: Stand with your feet hip-width apart. Push your hips back and bend your knees to lower into a squat (in preparation to leap). Explosively jump as high as you can. Land softly, and then immediately squat down to jump again. Do 10 reps total. Imagine that you’re pushing the floor away from you as you leap. You can use your arms to help you jump higher.

5. KETTLEBELL SWING

Kettlebell exercises combine cardio and strength training to tighten up your trouble zones in no time. No kettlebell? You can use a dumbbell instead.

How to do it: Hold a kettlebell (or dumbbell) with both hands and stand with your feet hip-width apart, knees slightly bent. Bend at your hips and lower your torso until it forms a 45-degree angle to the floor, keeping lower back naturally arched. Swing the kettlebell between your legs. Keeping your arms straight, thrust your hips forward, straighten your knees, and swing the kettlebell up to belly-button/chest level. Continue swinging until you’ve completed 10 reps with a challenging weight (17 to 26lb kettlebell depending on your fitness level).

Thursday, July 26, 2018

Best Exercises to Lose Arm Fat at Home

Flabby arms are a huge problem, both for men and women. Women want their arms toned, so they can wear a sleeveless dress without embarrassment. On the other hand, men want huge muscles. The flabby arms make the arms look bigger than they actually are.

It is often the case that besides having a normal body, there is some extra fat accumulated on the arms. Belly fat and arm fat are the most difficult parts to get rid of fat.


Aging is never easy to embrace, especially when it comes to drooping skin. Another reason for saggy arms can be decreased metabolism. The metabolism rate decreases with the growing age, which means burning fewer calories. And this condition ultimately leads to arm fat. Moreover, lack of physical activities can lead to fat accumulation and flabby arms.

If you want your muscles toned, firm and looking young, the most effective way is to be physically active. This does not mean that you need to hit the gym every day. On the contrary, there are several exercises that can be easily performed at home.

With these arm toning exercises you can make your flabby arms – fabulous in just 2 months. You need to be determined enough to do so. You won’t only reduce fat in this area, but also firm them up.

However, no matter how hard you exercise if you don’t follow a healthy diet, you’ll have a hard time reaching your goals. You need to start with cutting down on unhealthy and high-calorie food, eating fresh to stay healthy and look healthy.

This video will show you the best exercises to lose arm fat at home.

Try the following workout video:

https://youtu.be/hAGfBjvIRFI

These 10 Exercises Are More Effective Than Running

There is no doubt that cardio workout is extremely effective when it comes to burning fat. However many people hate running and that is why in today’s article we present to you 10 exercises that are more effective than running.


Following is the 10-exercises program which can be considered as an alternative to the cardio training or more precisely of the running. Perform each exercise correctly as many times as it is suggested to you, in order to gain the beneficial effect of the workout fully.

1. Burpees

Stand straight, then bend your knees with your hands touching the ground. Next position yourself in a push-up position, do a push-up and they raise again in the initial position with your hands up in the air.

2. Plank

Planks are the best exercise for the abdominal area. It is very easy and simple. You just need to position yourself in a push-up position with your elbows (at a 90% angle). Make sure your body is in a straight line from toes-to-head.

3. Squats

Start with your shoulders wide apart and your legs as well. Keep your back straight as you go down with your butt as you ware sitting. Hold it for a few seconds and then go up in the initial position.

4. Push-Ups

Start on your hands and knees with your hands underneath your shoulders. Then come onto the balls of your feet and the heels of your hands, and then walk the feet back until you are in the plank position. Bend your elbows, lowering your body down. Then slowly push yourself back up to the starting position.

5. Jumping Jacks

Keep the knees slightly bent and land softly on the balls of your feet. Engage your core and glutes and maintain your knees in line with your hips and feet. Keep your arms extended and your elbows lose during the entire exercise and maintain a steady and smooth breathing pattern.

 6. Frog Jump

After you place yourself in a plank position, jump forward while keeping the hands fixed on the ground. After that return to the previous position and repeat the exercise.

7. Step Up

Follow the detailed instructions on the photo and perform the exercise correctly as it is presented to you in order effective results to be achieved. Perform 15 reps each leg x 3 sets.

8. Lunges

Start the exercises standing with your feet shoulder-width apart and your hands on your hips. Then step forward with one leg and flex your knees until your rear knee nearly touches the floor. After that, bring your body back. Switch legs and Repeat it 20 times

9. Spiderman Plank

Get into plank position, feet shoulder-width apart and hands directly under shoulders to start. Engaging core, bring right knee to the outside of right elbow without shifting weight to the left side. Return to starting position and switch sides, bringing left knee to left elbow. Keep body weight centered throughout.

10. Donkey Kicks

Start on all fours, but support your body using your elbows. Lift and extend one leg as high as you can and hold it in the air for 10 seconds. After that repeat the exercise with the other leg.

Best Yoga Poses for Fast Weight Loss & Flat Belly

Yoga is touted as a way to “burn fat without breaking a sweat!” But is this really true? We’re here to tell you…

Hell yeah, it is!

Yoga has many benefits, including helping you lose weight!


1. Wide-Legged Forward Bend (Prasarita Padottanasana)

wide legged forward bend yoga poseTraditionally, your hands should be touching the floor in front of you in this pose, but we like the extra shoulder stretch!

Spread your feet 3-4 feet apart, and bend forward at the HIPS, not the waist.  This means that your back should be as straight as possible when you bend, and you should not simply “hunch” forward.

If you’re bending properly, you will actually feel a strong stretch in the hamstrings.  Practice in front of the mirror to try to get the correct form.

Hold for 5-6 breaths. If you feel comfortable enough, clasp the hands behind the back.  Try to bring them up towards the ceiling to give the arms and shoulders an extra stretch.

2. Lunge (Anjaneyasana)

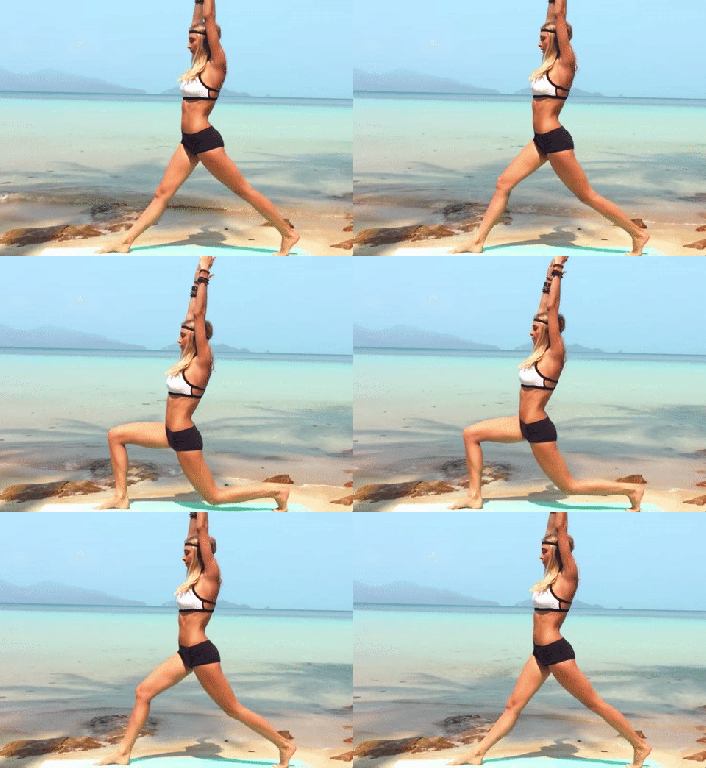
lunge asana for weight lossThis is one of the best poses for stretching the hips.  Many people tend to have tight hips from sitting in front of a computer all day.  It will also help increase your flexibility for the splits if that happens to be one of your goals.

Keep in mind that your hands can be wherever you want them to be in this asana, and their location often determines what muscles you are stretching.

If you raise the arms up and tilt them backward, you will bring this stretch into the back as well as the hips.  You can also bring the arms down to your sides and behind you a bit to stretch the lower back.  The third option is to rest them on the knee in front of you, although you won’t get as deep of a stretch in the hips.

Make sure your front knee is as close to 90 degrees as possible.

Hold for 30 seconds, and repeat on the other side.

3. Half Boat Pose (Ardha Navasana)

half boat asana to lose weightThis is a great yoga asana for weight loss because it directly works the tummy!  You’ll feel your ab muscles working hard as you try to hold this pose.

Put your palms down on the ground for balance, and raise the legs first.  When you feel stable enough, raise the arms so that they are parallel with the ground.

If you feel that this is too “easy,” try increasing the space between your knees and chest by leaning back a little and moving the knees a little farther away from you.  You should feel your abs burning if you’re doing it right!

Hold for 30 seconds.

If you feel comfortable in this pose, try straightening the legs for an extra challenge.  This is full boat pose, and it is much more difficult to balance in.

4. Side Plank (Vasisthasana)

side plank pose to lose weightIt’s no wonder that some form of the “plank” made this list of yoga asanas for weight loss.  The plank and all of its variations are great for the abs!

Begin in regular plank position with your palms face down on the yoga mat, shoulder-width apart, and your toes together on the mat.

Tilt your feet to the left so that the outer right side of your right foot is touching the mat and the left foot is on top of the right (as pictured above).

Shift your weight onto your right hand as you remove your left hand from the ground.  Slowly lift your left arm straight up ahead of you towards the ceiling.

Your hips and shoulders should be “stacked” in this pose, meaning that they should directly in line with each other and not leaning forward or backward.

Hold for 30 seconds, and repeat on the other side.

5. Tree Pose (Vriksasana)

tree asana for weight lossDon’t be fooled by tree pose.  It’s harder to balance in this pose than it looks!

Bring your left foot in to rest on the inside of your left thigh.  Keep your back straight.  Your body may have a tendency to lean forward when trying to balance but bring your shoulders back up.

Keep your hands pressed together at your heart to help with balance, then try lifting them above your head with your hands pointed towards the ceiling.

Hold for 30 seconds, and repeat on the other side.

6. Revolved Lunge Pose (Parivrtta Anjaneyasana)

lunge variation poseIf you need to, keep the right hand on the floor next to the left foot for support while getting into this pose.

Try to keep your front knee bent at a 90-degree angle and your outstretched leg straight.

Bring your right elbow to rest on your left knee, and bring the hands together.  Press the hands into each other to increase the stretch in the back and shoulders.

Tighten your core while in this pose for an extra workout in the abs!

Hold for 5-6 breaths or up to 30 seconds, and repeat on the other side.

These 6 Workouts Help You Prevent Hunched Shoulders

You have a great body but a bad posture and rounded shoulders which can portrait a totally different picture of you. Your tummy may look fat and you will look shorter than your actual height. You must correct your body posture to avoid any possible health issues. These 6 workouts will not only help you to have better posture but also prevent hunched shoulders.


As with any workout, it is important to perform warm up stretches to avoid any injury. Similarly you should also do stretches to finish this better posture workout routine. You will need dumbbells and counter to perform these workouts. You should rest for about 15 seconds in between each workout.

The better posture workout is divided into three parts. First stretches to warm up. These 8 stretches will prepare your body to start the better posture workout.

Second part is the better posture workout that will help you stand tall and prevent possible hunched shoulders. There are 6 workouts in this routine each 45 seconds long. You take a break of 15 seconds in between each exercise.

Third and last part consists of stretches once again. There are 7 stretches to complete this workout.  Here are some good tips to deal with sore muscles after workout.

1 Stretches to warm up

  • Shoulder rolls 20 seconds
  • Head Nods 20 seconds
  • Head Turns 20 seconds
  • Head Tilts 20 seconds
  • Head Rolls 20 seconds
  • Small Arm Circles 20 seconds
  • Big arm Circles 20 seconds
  • Toe Touch Reach 20 seconds


2 Toning Posture Workout

  • Tripod Rows 45 Seconds each side
  • Bird Dog 45 seconds
  • Tripod Fly 45 seconds each side
  • Modified Back Bow 45 seconds
  • Up and Over Press 45 Seconds
  • Bent Over Ventral Raise 45 Seconds


3 Stretches for Better Posture

  • Front Arm Swings 20 seconds
  • Toe Touch Reach 20 seconds
  • Wall Chest Stretch 20 seconds
  • Overhead Toe Touch 20 seconds
  • Downward Dog 20 seconds
  • Cobra Stretch 20 seconds
  • Child’s Pose 20 seconds


Here are the video instructions for these better posture workout that will help you to prevent hunched shoulders.


Thursday, July 19, 2018

3 moves to get rid of your muffin top

Muffin tops are a problem spot for many people, you know that the fat can be difficult to get rid of. With this fat, it can be difficult to wear jeans , especially skinny ones, and you can forget about wearing attractive tops.

These 3 waist-whittling moves to get rid of your muffin top :


Standing Twists

  • Place your hands behind your head, elbows out wide and knees slightly bent. Isolate your core making sure your hips don't move.
  • Twist to one side then the other alternating sides.
  • Do 100 reps.

Side Bends

  • Stand with your feet hip-distance apart, arms at your sides.
  • As you reach down towards your toes with one arm, lift the other one up towards your waist, placing your hand on your hip.
  • Alternate sides with one arm up, one arm down.
  • Do 100 reps.

Jack Knives

  • Lay on the floor or a bench with your legs straight out, arms stretched above your head, toes pointed towards the ceiling.
  • Raise your arms towards your toes as you raise your legs to a 45- to 90-degree angle, keeping your shoulders off the floor (above). You should bring your arms way up over your belly button so your body looks just like a jack knife.
  • Then return back to the floor or bench with your legs and arms stretched out.
  • Do 40 reps.

Remember, Workout helps, but food is 85 percent of the results we see, Make sure that you eat foods that are healthy and that promote fat loss. (Read: 10 Best Foods For a Flat Belly).

(source: popsugar.com)

This is Best Workout to Help You Lose Arm Fat

Flabby arms or bat wings are major concern for many people, especially women. You can easily ignore the arms in overall body workouts and end up having a flabby appearance. Some have this problem of flabby arms after quick weight loss.


You can get a slim and toned arms easily with a little perseverance and some changes in your lifestyle regardless of the reason behind flabby arms. All you have to do is to do this one workout routine to banish flabby arms which you hate.

You will need light weight dumbbells, exercising mat and a timer to perform these workouts. You should be able to follow these exercises without leaving your home.

Workout to Lose Arm Fat:

  • Standing V Raise (20 Seconds)
  • Shoulder Press (20 Seconds)
  • Kickbacks (20 Seconds)
  • Triceps Extension (20 Seconds)
  • In & Out Curls (60 Seconds)
  • Inside Curls (60 Seconds)
  • Reverse Flys (60 seconds)
  • Havyk Raises (60 Seconds)
  • Dips (60 Seconds)
  • Pushups (60 Seconds)
  • Reverse Curls (60 Seconds)
  • Curl Holds (20 Seconds)


You can all of these workouts at home if you have dumbbells and a counter.

You must also try to change your eating habits and switch to clean lean diet so that you lose weight.  Drinking plenty of water, sleeping well, eating more fruits and vegetables can help you lose weight.

Credit: fireupfitness.com

5 BUTT EXERCISES THAT ARE BETTER THAN SQUATS


1. Single-Leg Deadlift With Kettlebell

The single-leg deadlift not only works your backside, targeting both the hamstring and the glutes but also works the core.

– Hold a kettlebell (between 10 and 20 pounds) in your right hand, and lift your left foot slightly off the ground.
– Keeping your back neutral, lean your entire torso forward while raising your left leg, which should stay in line with your body. The kettlebell will lower toward the ground. Keep your left shoulder blade pulled down your back.
– With your back straight, return upright, coming to your starting position. This completes one rep. Maximize this move by keeping your right foot off the ground as you go through your reps.

– Do 12 reps on each leg, for three sets.

2. Curtsy Lunges

Stand with your feet shoulder-width apart and your hands on your hips. Keeping your hips square, cross your right leg behind you and step backward as you lower your right knee toward the floor. Your left knee should remain directly above your left ankle. Pause, then press into your left heel as you stand and extend your right leg into a side kick. Repeat for 45 to 60 seconds before you switch legs. Do 10 reps.

3. Hydrants with Leg Extension

Begin on all fours with your knees hip-width apart and your wrists stacked over your shoulders. Lift your left knee toward the ceiling, then extend the left foot straight out to the side. Pause before you bend your knee again, and bring your leg back to starting position. Repeat for 45 to 60 seconds on the left side before you switch to the right. Do 10 reps.

4. Step-Ups

Walking up flights of stairs is great for your tush, but stepping up onto a chair is an even more effective move.
– Stand in front of your chair and place your left foot in the center of the seat.
– Step up onto the chair and bring your right knee forward and up.
– Lower yourself back to the floor, with the foot landing quietly.
– Switch legs and repeat to complete one rep. Do 20 reps total.

5. Bear Plank Leg Lifts

Begin in a plank position with your shoulders stacked above your wrists. Bend both knees slightly as bend your left knee to 90 degrees. With a flexed foot, squeeze your glutes, and raise your right heel up toward the ceiling as high as you can. Pause, then bring your left knee back to meet your right knee. Repeat for 45 to 60 seconds before switching sides. Do 10 reps.
Credit:diaryofafitmommy.com

6 Easy Exercises to Tone and Trim your Inner Thighs

If you suffer from excess fat in your inner thighs, don’t despair. You can tone your inner thighs with specific exercises and dietary changes that will target full body weight loss. Toning your inner thighs will make them stronger and more attractive and will improve your confidence when you go to the beach or wear leggings and skinny jeans.


The inner thigh is not an area you use through everyday activities, so what’s good about the exercises below is that while they focus on the inner thighs, they also use other larger leg muscles which will benefit other parts of your body.

Start your exercise with a few minutes warm-up. You can do these exercises at the comfort of your home 3 to 4 times per week while working on other parts of your body, such as abs, back, butt and legs.

Frog Bend

In this exercise no equipment is necessary and you only use gravity for resistance.

  • Lie on a floor or a mat with your face up, while your legs are extended straight over hips. Keep your feet flexed, heels together, and toes turned out.
  • Slowly bend your knees out to the sides, and then straighten them back, using your inner-thigh muscles to control the movement.
  • Do 3 sets of 10 reps, while resting in between each set as needed.

Scissor kicks

These kicks are good for your core muscles and also strengthen your thigh muscles by moving your legs in multiple directions.

  • Lie on your back, while your arms are down by your sides.
  • You can do the exercise in 2 directions: (A) Raise your feet about 30 cm off the floor. 
  • Controlling your core muscles, scissor your legs up and down for 10 reps. (B) Without resting, now scissor your legs side to side (choose which foot crosses over top at the center and alternate between the legs) for 10 more reps for each leg. This is one set.
  • Repeat for 3 sets, trying not to drop your legs in between.

Side and cross-over lunges

This exercise will help you to tone your inner thighs as it hits them from different directions.

  • Stand straight with your feet shoulder-width apart. Take your left foot making a wide side-step (illustration A). Bend your right knee so you push your hips behind you when you are stepping aside (keep your back straight and your face forward). Your right leg remains extended as you move your body weight on your left side.
  • Touch the ground with your finger tips so your arms on either side of the left foot. Return to standing position. Perform 1 set for each leg, 10-15 repetitions.
  • For the classic lunges (illustration B), stand with your right leg forward and left leg back. Then slowly bend the knees until both legs are nearly at right angles. Then push back up to starting position. Remember to keep your back straight and don’t let your knees extend over your toes. 
  • Perform 1 set for each leg, 10-15 repetitions.

Seated Ball (or Pillow) Squeeze

  • Sit on a chair, resting your feet on the floor. Your knees are bent at 90 degrees.
  • Place a ball (or a pillow) between your thighs and inhale. Exhale as you squeeze the ball between your thighs.
  • Hold for 1 minute while breathing normally. Rest 30 seconds to 1 minute between sets.


Inner Thigh Lift and Circles

  • Lie on your right side while supporting your head with your bent arm as per the illustration below (alternatively you can fold your arm down and rest your head on it).
  • Bend your left leg and place your foot on the floor in front of your right leg, holding your ankle for support. Your right leg is extended.
  • Use your inner thigh muscles to lift your right leg upwards at least 15 cm. Hold for a few seconds and then slowly lower your leg back. Alternatively you can draw imaginary circles on the back wall.
  • Repeat 10-20 times for each side.


Side Squat with Band

Resistance bands are inexpensive and can be used for a total body workout. They also offer you the option of using different levels of resistance depending on your fitness level.

This exercise works on your inner and outer thighs, hips and bottom. You can do this exercise without the resistance band, but the band will further increase the efficacy of this exercise.

  • Stand while your feet are shoulder-width apart and tie a band around your lower legs.
  • Lift your left leg and step out to the left while pressing out against the resistance of the band. When your left foot touches the floor, bend your knees into a deep squat.
  • Then stand up again and bring your feet back to shoulder-width apart.
  • Repeat – Either alternate legs or take 10 steps to the left and then 10 steps to the right.


Keep up the good work and give your inner thighs the attention they need!

(source: healthyandnaturalworld)

Sunday, July 15, 2018

8 Best Exercises For Women’s Health Over 40

Many people tend to get less active as they get older which is exactly the opposite of what experts recommend. As your body ages you need to be taking extra care of it by working out sensibly and keeping it in tip-top form. This will not only keep you looking and feeling younger but it will help to prevent all kinds of diseases, aches and pains.


Do you want to be hunched over with a bad back and a walking stick aged 70? No, we don’t either! We’ve compiled a list of the 8 exercises that are specifically designed for over 40s that will have you skipping into old age stronger and fitter than you were in your 20s.

SLEEP
It’s not technically and ‘exercise’ but it is one of the most important part of any workout routine! Without adequate sleep your body can’t repair the muscles that you’ve been working out at the gym, which means that all your hard work is for nothing. Sleep deprivation leads to grouchiness and lethargy, which means lack of motivation to even get down to the gym in the first place. What’s more, studies have shown that individuals that don’t get enough sleep are more likely to look for energy from extra calories. So make sure you are getting enough shut eye to be on form and focused every day.

T-TO-Y ARM RAISES
This is a simple but incredibly effective exercise that you can add to your routine. Hold your arms out to the side in a T shape and raise them to the count of three up to a Y shape, then lower back down. If you find this too easy pick up some weights – anything will do, even a can of beans or a water bottle. Try increasing the weight as the exercise becomes easier. This nifty exercise works your back, shoulders and arms which are key areas of concern as you get older. Studies have shown that poor posture disproportionately affects the older generation and this is due in large part to muscle weakness in the upper back and shoulders.

WALKING BACKWARDS
This one takes a bit of getting used to but it will work wonders for your core strength and balance. We’re not asking you to walk miles and miles backwards but incorporating 10 backwards steps every few minutes when you are out walking will make a big difference in the long term. Not only is it good for your balance and coordination but it works the two major muscles in your calves and works on the tendons in your lower leg.

WALKING (FORWARDS!)
Walking is one of the great simple (and free) pleasures of life, and luckily it’s a great way to lose weight and stay fit. In today’s climate of super faced paced living people feel like they don’t have time to go for a walk and enjoy the process of travelling through their environment.

For retirees though, that’s not usually an issue. Walking just 40 minutes at a comfortable pace will burn 160 calories and walking 3 miles will burn just as many as running the same distance. So you don’t need to be a Speedy Gonzales to reap the benefits of this exercise!

ONE LEGGED SQUAT
One legged squats require good balance and stability, particularly in the core, hip and shoulder. So they are a great exercise for older people that want to maintain good overall form and are looking for an exercise that they can build up to.

If you can’t squat one-legged already, you can easily start with a simple sumo squat: with your feet hip-width apart slowly bend the knees until you thighs are at a 90 degree angle with the floor. Make sure your knee doesn’t come past your toes and that you keep a nice strong back and shoulder with your core engaged. From here you can build up the strength to do a one legged squat – keep one leg grounded while the other in extended out in front of you.

ROWING MACHINE
As you age, a key focus point should always be your shoulder joints and upper back. If you keep these strong then you’ll be able to maintain a good posture and you’ll avoid the painful back problems that often plague older people.

Rowing machines in gyms are a great way to work your muscles and get a cardio workout at the same time, so you’ll be burning calories, building strength and getting fitter all in one go. If you don’t have a gym membership then why not get outdoors and try out the real thing? Regular outdoor activities have been shown to reduce stress levels and lower blood pressure, reducing the risk of heart-related illnesses.

SINGLE LEG DEADLIFT
Single leg deadlifts work much like the single legged squat in that they focus on your balance, coordination and stability. It’s also a great exercise for that key area the back and shoulders.

Choose a weight that fits your ability – you should be able to do three sets of 8-12 reps, with the last few reps being a struggle (without compromising form!). Hold your weights in each hand with your arms by your sides. Now, standing with feet hip-width apart, raise one leg off the ground behind you, then lower your upper body by bending at the hip and keeping a flat back.

7 Minute Butt & Thigh Workout With no Equipment


You can not hide a flat ass in a swimsuit. The beach season is a hard time for saggy buttocks! Get ready for the summer vacations with our training program. If you regularly visited the gym at winter, preparing hard for the summer, it is the time to show the results of your efforts now!

1. Chair Kickback

You can use a chair or even a bed to support your upper body while doing this move.


How to do it

  • Stand about 2 feet away from a bench or edge of a bed.
  • Keep your thighs and feet close together.
  • Lean forward to the supporting object and hold firmly with both hands.
  • Your torso should be parallel to the ground.
  • Now you’re going to lift your left leg backwards until it’s parallel to the ground.
  • Hold the position for 1 second and return to the starting point then do the other leg.


2. Squat Pulse


Starting in a standing position go down into a squat position — think weight should be shifted back on your heels, knees NOT over your toes, and your chest tall. Pulse out three squats, going up and down by just a few inches. After three, go straight from a squat position and power through jumping into the air as high as you can go.

3. Squat Kick 


Hamstring toner and booty lifter! Make sure to alternate legs. Flex your feet.

4. Squat


Squat Side Kicks – Start with your feet slightly wider that hip width, and slowly lower your body into a traditional squat position. As you reach the lowest point of the squat, raise your left knee and quickly kick your leg to the left, like a karate kick. Keep your right leg stable, and return your left leg to the floor before coming out of the squat. Alternate between sides.

5. Lunge Pulse 


f you’re able to keep going without taking a pause… after your last lunge squat you’re going to hold the position and transition to…

Thursday, July 12, 2018

5-Minute Yoga Routine for Strong, Slim Arms

Want toned shoulders, biceps and triceps? Flow through this 5-minute routine.


STRENGTH THROUGH YOGA

My new clients are often skeptical when I tell them yoga is one of the best ways to build upper-body strength. They think they have to spend hours in the gym pumping iron to get sculpted arms. Not so! The truth is, yoga in general and this sequence in particular can do the job. The moves engage every part of the arm. Plus, supporting your own body weight is great strength training.

Hold each pose for 5 breaths, and complete the entire series 5 to 8 times. Do 3 to 5 of these workouts a week to tone up and gain muscle in just 14 days. You might never lift another free weight.

DOWNWARD DOG
Kneel on all fours with hands directly under shoulders. Tuck toes under and exhale, lifting hips toward ceiling. Move shoulders away from ears, drawing front ribs in; push into hands and feet.

PLANK
Inhale, lowering hips, coming onto toes and moving torso forward, with shoulders directly over wrists. Contract abs and straighten arms; keep body in line from head to heels.

SIDE PLANK
Exhale, rotating torso and stacking right foot on top of left. Press torso up (body in straight line) with abs tight. Raise right hand up, fingers toward ceiling; gaze up or forward. Inhale; return to plank. Repeat on other side.

CHATURANGA
Exhale, keeping body in a straight line and bending elbows to 90 degrees while lowering toward floor. Contract abs; be careful not to round shoulders forward.

UPWARD DOG
Inhale, lowering hips toward floor. Untuck toes; push into hands, straightening arms, lifting chest and engaging abs. Hug shoulder blades together and down away from ears. Exhale, lifting hips to return to Downward Dog.

Wednesday, June 27, 2018

2 Weeks Hard Core 6 Pack Abs Workout Challenge

1- GENIE ABS
Sit down on yoga mat and lean back. Bend your knees and touching the floor with leg. Straight the arms on shoulders and bend your elbows. Keep one arm on another straight like genie does. Now lift the leg to arms and bring it back to floor. Do this genie ab exercise 40 times.


2- EAGLE ABS
Now lay down slowly on yoga mat. Now twist the leg with each other and twist the arms as well. Bring the knees to elbows and elbows to knees. Squeeze your tummy when you do the crunches Do this eagle abs exercise 30 times.

3- RUNAWAY ABS
Stay in lay down position and keep legs up in the air. Arms on the back of head and lift the head up. Now start kicking your legs like flutter kicks. Do this runaway abs exercise for 50 times.

4- STAR ABS
Stay in laying position. Lift the head up. Take hands on over head on back (not up) then spread them and legs straight without touching the floor then spread them. Bring your knees to chest with help of your hands. Bring back legs to straight and spread and same as arms as well. Do this star abs exercise for 25 times.

5- CLOCK ABS
Sit on yoga mat folding the knees and touching the floor with your legs. Lean back your upper body. Take the support from your arms keeping on floor folding the elbows. Now straight the legs up and take round rolling them like a clock. Do same on opposite direction. Do about 12 clock abs exercise

6- HOLLOW ROCK
Lay down on yoga mat. Keep your one leg on another one and hold your hands together. Now rock your body from up to down and down to up. Do this hollow rock exercise for 15 times.

7- SINGLE LEG DROP
Lay down straight on yoga mat. Lift the legs up straight. Now drop one leg without touching the floor. Bring it up in straight up position. Now drop another leg and bring it back. Do this single leg drop for 25 times.

8- EARTHQUAKE
Sit on yoga mat. Keep legs straight touching the floor and lean back upper body. Keep the arms straight on shoulder level. Hold in this position as much as you can. Take your arm up and down one by one for 10 times. Then get back your arms in straight position and stay in this position as long as you can.