f

Thursday, July 26, 2018

Lose 12 Pounds in 1 Week With This Egg Diet

The struggle to lose weight is a difficult task, and people constantly seek a way to find the best way or advice for quick weight loss. Here is the one you need! This diet is easy to follow and you can lose 12 pounds in a week!


The Egg Diet:

Eggs are full with protein and nutrients, which makes them extremely healthy, and they provide your body with the majority of vitamins and nutrients. Consuming eggs and reducing unhealthy foods for a week, you will speed up your metabolism and start losing weight. Don’t get discouraged when you look at the diet and you don’t see much food, but eggs provide satiety.

The Plan:

If you are looking to speed up the weight loss even more, you can try some of  healthy weight loss drinks while you are dieting.

Day 1:

Breakfast: 2 boiled eggs, 2 oranges, 1 cup of low-fat milk
Lunch: 6 ounces of boiled skinless chicken, 1 cup of yogurt
Dinner: 1 boiled egg, 5 ounces of boiled skinless chicken and one orange

Day 2:

Breakfast: 2 boiled eggs with juice squeezed from one lemon
Lunch: 5 ounces of roasted fish, 1 grapefruit
Dinner: 3 hard boiled eggs

Day 3:

Breakfast: 2 hard boiled eggs, 1 cup of warm water with 1 squeezed lemon
Lunch: 6 ounces of boiled beef, 1 grapefruit
Dinner: 3 hard boiled eggs.

Day 4:

Breakfast: 3 scrambled eggs with onion, parsley and dill
Lunch: 5 ounces of cooked chicken with salad
Dinner: 1 hard boiled egg, 2 oranges

Day 5:

Breakfast: 2 carrots, 2 hard boiled eggs, 1 tablespoon of sour cream
Lunch: 2 carrots, 1 cup of fresh orange juice
Dinner: 3 ounces of boiled fish, 1 boiled egg

Day 6:

Breakfast: 5 ounces of low-fat yogurt, 1 freshly squeezed lemon or orange
Lunch: 2 boiled eggs, 2 grapefruits
Dinner: 1 glass of water with squeezed lemon

Day 7:

Breakfast: 2 boiled eggs, half a grapefruit
Lunch: 6 ounces of beef, 1 orange
Dinner: 1 glass of water with squeezed lemon

The diet will provide incredible results, but you must not follow it for more than one week. You need to drink plenty of water and follow through with the steps to maximise your weight loss. After the week ends, return to your normal diet, but the first few days eat more cheese, eggs, oranges and grapefruit.

Best Exercises to Lose Arm Fat at Home

Flabby arms are a huge problem, both for men and women. Women want their arms toned, so they can wear a sleeveless dress without embarrassment. On the other hand, men want huge muscles. The flabby arms make the arms look bigger than they actually are.

It is often the case that besides having a normal body, there is some extra fat accumulated on the arms. Belly fat and arm fat are the most difficult parts to get rid of fat.


Aging is never easy to embrace, especially when it comes to drooping skin. Another reason for saggy arms can be decreased metabolism. The metabolism rate decreases with the growing age, which means burning fewer calories. And this condition ultimately leads to arm fat. Moreover, lack of physical activities can lead to fat accumulation and flabby arms.

If you want your muscles toned, firm and looking young, the most effective way is to be physically active. This does not mean that you need to hit the gym every day. On the contrary, there are several exercises that can be easily performed at home.

With these arm toning exercises you can make your flabby arms – fabulous in just 2 months. You need to be determined enough to do so. You won’t only reduce fat in this area, but also firm them up.

However, no matter how hard you exercise if you don’t follow a healthy diet, you’ll have a hard time reaching your goals. You need to start with cutting down on unhealthy and high-calorie food, eating fresh to stay healthy and look healthy.

This video will show you the best exercises to lose arm fat at home.

Try the following workout video:

https://youtu.be/hAGfBjvIRFI

These 10 Exercises Are More Effective Than Running

There is no doubt that cardio workout is extremely effective when it comes to burning fat. However many people hate running and that is why in today’s article we present to you 10 exercises that are more effective than running.


Following is the 10-exercises program which can be considered as an alternative to the cardio training or more precisely of the running. Perform each exercise correctly as many times as it is suggested to you, in order to gain the beneficial effect of the workout fully.

1. Burpees

Stand straight, then bend your knees with your hands touching the ground. Next position yourself in a push-up position, do a push-up and they raise again in the initial position with your hands up in the air.

2. Plank

Planks are the best exercise for the abdominal area. It is very easy and simple. You just need to position yourself in a push-up position with your elbows (at a 90% angle). Make sure your body is in a straight line from toes-to-head.

3. Squats

Start with your shoulders wide apart and your legs as well. Keep your back straight as you go down with your butt as you ware sitting. Hold it for a few seconds and then go up in the initial position.

4. Push-Ups

Start on your hands and knees with your hands underneath your shoulders. Then come onto the balls of your feet and the heels of your hands, and then walk the feet back until you are in the plank position. Bend your elbows, lowering your body down. Then slowly push yourself back up to the starting position.

5. Jumping Jacks

Keep the knees slightly bent and land softly on the balls of your feet. Engage your core and glutes and maintain your knees in line with your hips and feet. Keep your arms extended and your elbows lose during the entire exercise and maintain a steady and smooth breathing pattern.

 6. Frog Jump

After you place yourself in a plank position, jump forward while keeping the hands fixed on the ground. After that return to the previous position and repeat the exercise.

7. Step Up

Follow the detailed instructions on the photo and perform the exercise correctly as it is presented to you in order effective results to be achieved. Perform 15 reps each leg x 3 sets.

8. Lunges

Start the exercises standing with your feet shoulder-width apart and your hands on your hips. Then step forward with one leg and flex your knees until your rear knee nearly touches the floor. After that, bring your body back. Switch legs and Repeat it 20 times

9. Spiderman Plank

Get into plank position, feet shoulder-width apart and hands directly under shoulders to start. Engaging core, bring right knee to the outside of right elbow without shifting weight to the left side. Return to starting position and switch sides, bringing left knee to left elbow. Keep body weight centered throughout.

10. Donkey Kicks

Start on all fours, but support your body using your elbows. Lift and extend one leg as high as you can and hold it in the air for 10 seconds. After that repeat the exercise with the other leg.

Best Yoga Poses for Fast Weight Loss & Flat Belly

Yoga is touted as a way to “burn fat without breaking a sweat!” But is this really true? We’re here to tell you…

Hell yeah, it is!

Yoga has many benefits, including helping you lose weight!


1. Wide-Legged Forward Bend (Prasarita Padottanasana)

wide legged forward bend yoga poseTraditionally, your hands should be touching the floor in front of you in this pose, but we like the extra shoulder stretch!

Spread your feet 3-4 feet apart, and bend forward at the HIPS, not the waist.  This means that your back should be as straight as possible when you bend, and you should not simply “hunch” forward.

If you’re bending properly, you will actually feel a strong stretch in the hamstrings.  Practice in front of the mirror to try to get the correct form.

Hold for 5-6 breaths. If you feel comfortable enough, clasp the hands behind the back.  Try to bring them up towards the ceiling to give the arms and shoulders an extra stretch.

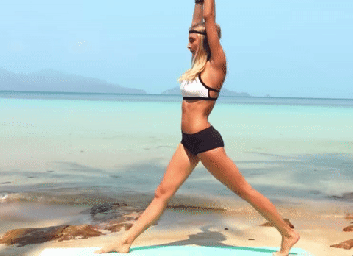
2. Lunge (Anjaneyasana)

lunge asana for weight lossThis is one of the best poses for stretching the hips.  Many people tend to have tight hips from sitting in front of a computer all day.  It will also help increase your flexibility for the splits if that happens to be one of your goals.

Keep in mind that your hands can be wherever you want them to be in this asana, and their location often determines what muscles you are stretching.

If you raise the arms up and tilt them backward, you will bring this stretch into the back as well as the hips.  You can also bring the arms down to your sides and behind you a bit to stretch the lower back.  The third option is to rest them on the knee in front of you, although you won’t get as deep of a stretch in the hips.

Make sure your front knee is as close to 90 degrees as possible.

Hold for 30 seconds, and repeat on the other side.

3. Half Boat Pose (Ardha Navasana)

half boat asana to lose weightThis is a great yoga asana for weight loss because it directly works the tummy!  You’ll feel your ab muscles working hard as you try to hold this pose.

Put your palms down on the ground for balance, and raise the legs first.  When you feel stable enough, raise the arms so that they are parallel with the ground.

If you feel that this is too “easy,” try increasing the space between your knees and chest by leaning back a little and moving the knees a little farther away from you.  You should feel your abs burning if you’re doing it right!

Hold for 30 seconds.

If you feel comfortable in this pose, try straightening the legs for an extra challenge.  This is full boat pose, and it is much more difficult to balance in.

4. Side Plank (Vasisthasana)

side plank pose to lose weightIt’s no wonder that some form of the “plank” made this list of yoga asanas for weight loss.  The plank and all of its variations are great for the abs!

Begin in regular plank position with your palms face down on the yoga mat, shoulder-width apart, and your toes together on the mat.

Tilt your feet to the left so that the outer right side of your right foot is touching the mat and the left foot is on top of the right (as pictured above).

Shift your weight onto your right hand as you remove your left hand from the ground.  Slowly lift your left arm straight up ahead of you towards the ceiling.

Your hips and shoulders should be “stacked” in this pose, meaning that they should directly in line with each other and not leaning forward or backward.

Hold for 30 seconds, and repeat on the other side.

5. Tree Pose (Vriksasana)

tree asana for weight lossDon’t be fooled by tree pose.  It’s harder to balance in this pose than it looks!

Bring your left foot in to rest on the inside of your left thigh.  Keep your back straight.  Your body may have a tendency to lean forward when trying to balance but bring your shoulders back up.

Keep your hands pressed together at your heart to help with balance, then try lifting them above your head with your hands pointed towards the ceiling.

Hold for 30 seconds, and repeat on the other side.

6. Revolved Lunge Pose (Parivrtta Anjaneyasana)

lunge variation poseIf you need to, keep the right hand on the floor next to the left foot for support while getting into this pose.

Try to keep your front knee bent at a 90-degree angle and your outstretched leg straight.

Bring your right elbow to rest on your left knee, and bring the hands together.  Press the hands into each other to increase the stretch in the back and shoulders.

Tighten your core while in this pose for an extra workout in the abs!

Hold for 5-6 breaths or up to 30 seconds, and repeat on the other side.

These 6 Workouts Help You Prevent Hunched Shoulders

You have a great body but a bad posture and rounded shoulders which can portrait a totally different picture of you. Your tummy may look fat and you will look shorter than your actual height. You must correct your body posture to avoid any possible health issues. These 6 workouts will not only help you to have better posture but also prevent hunched shoulders.


As with any workout, it is important to perform warm up stretches to avoid any injury. Similarly you should also do stretches to finish this better posture workout routine. You will need dumbbells and counter to perform these workouts. You should rest for about 15 seconds in between each workout.

The better posture workout is divided into three parts. First stretches to warm up. These 8 stretches will prepare your body to start the better posture workout.

Second part is the better posture workout that will help you stand tall and prevent possible hunched shoulders. There are 6 workouts in this routine each 45 seconds long. You take a break of 15 seconds in between each exercise.

Third and last part consists of stretches once again. There are 7 stretches to complete this workout.  Here are some good tips to deal with sore muscles after workout.

1 Stretches to warm up

  • Shoulder rolls 20 seconds
  • Head Nods 20 seconds
  • Head Turns 20 seconds
  • Head Tilts 20 seconds
  • Head Rolls 20 seconds
  • Small Arm Circles 20 seconds
  • Big arm Circles 20 seconds
  • Toe Touch Reach 20 seconds


2 Toning Posture Workout

  • Tripod Rows 45 Seconds each side
  • Bird Dog 45 seconds
  • Tripod Fly 45 seconds each side
  • Modified Back Bow 45 seconds
  • Up and Over Press 45 Seconds
  • Bent Over Ventral Raise 45 Seconds


3 Stretches for Better Posture

  • Front Arm Swings 20 seconds
  • Toe Touch Reach 20 seconds
  • Wall Chest Stretch 20 seconds
  • Overhead Toe Touch 20 seconds
  • Downward Dog 20 seconds
  • Cobra Stretch 20 seconds
  • Child’s Pose 20 seconds


Here are the video instructions for these better posture workout that will help you to prevent hunched shoulders.


Thursday, July 19, 2018

Apple Cider Vinegar Morning Detox Drink

Apple cider vinegar is an extremely versatile ingredient that can be used to help balance pH levels, boost the metabolism, or remove toxins and waste from the body. You’ll be amazed at the results several days after continued consumption.


Ingredients

  • 2 tbsp. raw organic apple cider vinegar
  • 2 tbsp. freshly squeezed lemon juice
  • 1 tsp. raw agave
  • 1 tsp. cinnamon
  • 1 c boiled water, cooled enough to drink


Instructions

  1. Add the apple cider vinegar, lemon juice, agave, and cinnamon to the cup of hot water. Stir until everything is thoroughly mixed.
  2. Drink this in the morning before breakfast and drink another cup before you go to bed. You'll have the best results if you consume this as such.


Source: Skinny Fit Mom

3 moves to get rid of your muffin top

Muffin tops are a problem spot for many people, you know that the fat can be difficult to get rid of. With this fat, it can be difficult to wear jeans , especially skinny ones, and you can forget about wearing attractive tops.

These 3 waist-whittling moves to get rid of your muffin top :


Standing Twists

  • Place your hands behind your head, elbows out wide and knees slightly bent. Isolate your core making sure your hips don't move.
  • Twist to one side then the other alternating sides.
  • Do 100 reps.

Side Bends

  • Stand with your feet hip-distance apart, arms at your sides.
  • As you reach down towards your toes with one arm, lift the other one up towards your waist, placing your hand on your hip.
  • Alternate sides with one arm up, one arm down.
  • Do 100 reps.

Jack Knives

  • Lay on the floor or a bench with your legs straight out, arms stretched above your head, toes pointed towards the ceiling.
  • Raise your arms towards your toes as you raise your legs to a 45- to 90-degree angle, keeping your shoulders off the floor (above). You should bring your arms way up over your belly button so your body looks just like a jack knife.
  • Then return back to the floor or bench with your legs and arms stretched out.
  • Do 40 reps.

Remember, Workout helps, but food is 85 percent of the results we see, Make sure that you eat foods that are healthy and that promote fat loss. (Read: 10 Best Foods For a Flat Belly).

(source: popsugar.com)

This is Best Workout to Help You Lose Arm Fat

Flabby arms or bat wings are major concern for many people, especially women. You can easily ignore the arms in overall body workouts and end up having a flabby appearance. Some have this problem of flabby arms after quick weight loss.


You can get a slim and toned arms easily with a little perseverance and some changes in your lifestyle regardless of the reason behind flabby arms. All you have to do is to do this one workout routine to banish flabby arms which you hate.

You will need light weight dumbbells, exercising mat and a timer to perform these workouts. You should be able to follow these exercises without leaving your home.

Workout to Lose Arm Fat:

  • Standing V Raise (20 Seconds)
  • Shoulder Press (20 Seconds)
  • Kickbacks (20 Seconds)
  • Triceps Extension (20 Seconds)
  • In & Out Curls (60 Seconds)
  • Inside Curls (60 Seconds)
  • Reverse Flys (60 seconds)
  • Havyk Raises (60 Seconds)
  • Dips (60 Seconds)
  • Pushups (60 Seconds)
  • Reverse Curls (60 Seconds)
  • Curl Holds (20 Seconds)


You can all of these workouts at home if you have dumbbells and a counter.

You must also try to change your eating habits and switch to clean lean diet so that you lose weight.  Drinking plenty of water, sleeping well, eating more fruits and vegetables can help you lose weight.

Credit: fireupfitness.com

5 BUTT EXERCISES THAT ARE BETTER THAN SQUATS


1. Single-Leg Deadlift With Kettlebell

The single-leg deadlift not only works your backside, targeting both the hamstring and the glutes but also works the core.

– Hold a kettlebell (between 10 and 20 pounds) in your right hand, and lift your left foot slightly off the ground.
– Keeping your back neutral, lean your entire torso forward while raising your left leg, which should stay in line with your body. The kettlebell will lower toward the ground. Keep your left shoulder blade pulled down your back.
– With your back straight, return upright, coming to your starting position. This completes one rep. Maximize this move by keeping your right foot off the ground as you go through your reps.

– Do 12 reps on each leg, for three sets.

2. Curtsy Lunges

Stand with your feet shoulder-width apart and your hands on your hips. Keeping your hips square, cross your right leg behind you and step backward as you lower your right knee toward the floor. Your left knee should remain directly above your left ankle. Pause, then press into your left heel as you stand and extend your right leg into a side kick. Repeat for 45 to 60 seconds before you switch legs. Do 10 reps.

3. Hydrants with Leg Extension

Begin on all fours with your knees hip-width apart and your wrists stacked over your shoulders. Lift your left knee toward the ceiling, then extend the left foot straight out to the side. Pause before you bend your knee again, and bring your leg back to starting position. Repeat for 45 to 60 seconds on the left side before you switch to the right. Do 10 reps.

4. Step-Ups

Walking up flights of stairs is great for your tush, but stepping up onto a chair is an even more effective move.
– Stand in front of your chair and place your left foot in the center of the seat.
– Step up onto the chair and bring your right knee forward and up.
– Lower yourself back to the floor, with the foot landing quietly.
– Switch legs and repeat to complete one rep. Do 20 reps total.

5. Bear Plank Leg Lifts

Begin in a plank position with your shoulders stacked above your wrists. Bend both knees slightly as bend your left knee to 90 degrees. With a flexed foot, squeeze your glutes, and raise your right heel up toward the ceiling as high as you can. Pause, then bring your left knee back to meet your right knee. Repeat for 45 to 60 seconds before switching sides. Do 10 reps.
Credit:diaryofafitmommy.com

6 Easy Exercises to Tone and Trim your Inner Thighs

If you suffer from excess fat in your inner thighs, don’t despair. You can tone your inner thighs with specific exercises and dietary changes that will target full body weight loss. Toning your inner thighs will make them stronger and more attractive and will improve your confidence when you go to the beach or wear leggings and skinny jeans.


The inner thigh is not an area you use through everyday activities, so what’s good about the exercises below is that while they focus on the inner thighs, they also use other larger leg muscles which will benefit other parts of your body.

Start your exercise with a few minutes warm-up. You can do these exercises at the comfort of your home 3 to 4 times per week while working on other parts of your body, such as abs, back, butt and legs.

Frog Bend

In this exercise no equipment is necessary and you only use gravity for resistance.

  • Lie on a floor or a mat with your face up, while your legs are extended straight over hips. Keep your feet flexed, heels together, and toes turned out.
  • Slowly bend your knees out to the sides, and then straighten them back, using your inner-thigh muscles to control the movement.
  • Do 3 sets of 10 reps, while resting in between each set as needed.

Scissor kicks

These kicks are good for your core muscles and also strengthen your thigh muscles by moving your legs in multiple directions.

  • Lie on your back, while your arms are down by your sides.
  • You can do the exercise in 2 directions: (A) Raise your feet about 30 cm off the floor. 
  • Controlling your core muscles, scissor your legs up and down for 10 reps. (B) Without resting, now scissor your legs side to side (choose which foot crosses over top at the center and alternate between the legs) for 10 more reps for each leg. This is one set.
  • Repeat for 3 sets, trying not to drop your legs in between.

Side and cross-over lunges

This exercise will help you to tone your inner thighs as it hits them from different directions.

  • Stand straight with your feet shoulder-width apart. Take your left foot making a wide side-step (illustration A). Bend your right knee so you push your hips behind you when you are stepping aside (keep your back straight and your face forward). Your right leg remains extended as you move your body weight on your left side.
  • Touch the ground with your finger tips so your arms on either side of the left foot. Return to standing position. Perform 1 set for each leg, 10-15 repetitions.
  • For the classic lunges (illustration B), stand with your right leg forward and left leg back. Then slowly bend the knees until both legs are nearly at right angles. Then push back up to starting position. Remember to keep your back straight and don’t let your knees extend over your toes. 
  • Perform 1 set for each leg, 10-15 repetitions.

Seated Ball (or Pillow) Squeeze

  • Sit on a chair, resting your feet on the floor. Your knees are bent at 90 degrees.
  • Place a ball (or a pillow) between your thighs and inhale. Exhale as you squeeze the ball between your thighs.
  • Hold for 1 minute while breathing normally. Rest 30 seconds to 1 minute between sets.


Inner Thigh Lift and Circles

  • Lie on your right side while supporting your head with your bent arm as per the illustration below (alternatively you can fold your arm down and rest your head on it).
  • Bend your left leg and place your foot on the floor in front of your right leg, holding your ankle for support. Your right leg is extended.
  • Use your inner thigh muscles to lift your right leg upwards at least 15 cm. Hold for a few seconds and then slowly lower your leg back. Alternatively you can draw imaginary circles on the back wall.
  • Repeat 10-20 times for each side.


Side Squat with Band

Resistance bands are inexpensive and can be used for a total body workout. They also offer you the option of using different levels of resistance depending on your fitness level.

This exercise works on your inner and outer thighs, hips and bottom. You can do this exercise without the resistance band, but the band will further increase the efficacy of this exercise.

  • Stand while your feet are shoulder-width apart and tie a band around your lower legs.
  • Lift your left leg and step out to the left while pressing out against the resistance of the band. When your left foot touches the floor, bend your knees into a deep squat.
  • Then stand up again and bring your feet back to shoulder-width apart.
  • Repeat – Either alternate legs or take 10 steps to the left and then 10 steps to the right.


Keep up the good work and give your inner thighs the attention they need!

(source: healthyandnaturalworld)

Tuesday, July 17, 2018

How To Get Ride OF These Red Spots From Your Body

These red spots that we don’t recognize can pop up on our skin out of nowhere! While most skin growths are harmless, some can be dangerous. In medical point of view when a red bump or rash is flat, it is  known as a macule. When the red spot is raised, it is known as a papule. Erythema is the medical term for redness of the skin. Red spots on the skin that occur singly can be a small benign tumor of blood vessels, known as a hemangioma. If you have these red spots, here is what they are.


Often times we will have a speck of skin rise to the surface. Sometimes their warts, moles, or skin tags. But sometimes these growths can be an indicator of cancer! Cancer that usually pops up as a skin growth is known as melanoma. It is a tumor of melanin-forming cells, typically a malignant tumor associated with skin cancer. However, all growths are not dangerous. People can grow moles out of nowhere, with no known cause. You can have them for life, as they are usually completely harmless.

Recently people have noticed an outbreak of these red spots! It is important to be informed when it comes to skin growths that haven’t always been there. They are usually on various parts of the body, and I’m going to tell you what you can do about them. They most commonly appear in people over the age of 40. However, it is still possible for them to show up in adolescents and children too.

Dermatologists explain that the red spots are small capillary dilations. These capillary dilation’s occur as a result of vascular system malfunctions. You most commonly see them on the upper arms and on the chest. They are either scattered around or packed tightly in together. There is no reason to worry about these red spots, as they are 100% benign. However, if they are a cosmetic issue for you, you can have them surgically removed. You can also use many natural remedies to get rid of them! But, don’t worry – you don’t have cancer.

source = “hlf-team.com/do-you-have-these-red-spots-on-various-parts-of-your-body-should-you-worry-what-should-you-do/”

I DARE You to Drink This for JUST 3 Days, and You Will Amazed What Happens to Scale

This drink will Boost your metabolism and start to lose weight with diet plans, workouts, and weight loss tips that will help you burn more calories than you’re taking in. This dare challenge is for all those who think that they cannot lose weight by drinking cleansing water having all natural ingredients. The dare is very simple and straight forward. You drink this for 3 days 3 times a day and then get on the scale and let me know what happened to the scale. This drink will help you lose weight and detoxify your body.  Are you up for this dare?


The 3 day 3 times a day dare challenge recipe is following.

Apple Cider Vinegar, Lemon and Cayenne  Cleanse Recipe

Ingredients:

  • 1000 ml of water
  • 1-2 tsp apple cider vinegar
  • 1/4 tsp cayenne pepper
  • 1-2 drops of lemon oil (therapeutic grade)
  • 1-2 tbs maple syrup (This is optional but I suggest you use it)


Preparation:

Preparation is simple as you have to mix all the ingredients and that is it. If you use lukewarm/hot water, it is even better but you can use water at room temperature as well.

ou should consume one glass of this drink before meal three times a day. Continue drinking it for thee days.

If you do not have lemon essential oil, then you can substitute it with the freshly squeezed lemon juice. Use lemon juice of half of a lemon. However, lemon essential oil is less acidic and is gentle on your teeth.

Another alternate can be grapefruit essential oil.  Some people cannot handle the apple cider vinegar. In that case try using less quantity first day and then increase it over the period of 3 days.

Why it work?

Apple cider vinegar will suppress your appetite as it contains a compound called pectin which serves as an appetite suppressant. You will fell satisfied and full for longer time. You will consume less food which will also digest quickly.

Lemon essential oil or lemon juice as well as cayenne will also help your body to flush the toxins and suppress your appetite..

Before accepting this dare, you should note your weight as well as consult your physician. It is not for everyone!

This Powerful Drink Melts Your Belly Fat Naturally

You don’t have anything to free with the exception of overabundance weight. The lion’s share of us are always battling in diminishing our midsection. I have invested hours scanning for a simple formula that will do the trap for me. I kept running into a companion of mine who looked astounding, after requesting the key to her thin midsection, she suggested this formula. She has been utilizing it and it has helped her to accomplish her objective of a slimmer midriff. She instructed me to attempt it for myself and see the distinction. You are presumably thinking about how it functions. It is basic, it flushes out abundance water from your body which takes care of the issue of water maintenance and consumes fat rapidly.


How to prepare this fat burning drink?

Ingredients:

  • 125g horseradish
  • 3 lemons (preferably organic)
  • 4 tbsp honey
  • 2 tsp cinnamon powder
  • 1 small piece of fresh ginger (2.5 cm)


Preparation:

This solid yet straightforward formula is anything but difficult to make as it contains every normal fixing that a great many people have in their kitchen, or that are effectively accessible from the nearby market. These fixings have been utilized for a long time in lessening weight.

Include horseradish and ginger in a blender. Cut lemon into little pieces, ensure seeds are expelled now include them into the blender alongside alternate fixings.

Include 4 tablespoons of nectar and 2 tsp of cinnamon powder and mix every one of the fixings together for two minutes. Put the fat consuming beverage in a jug and keep it refrigerated. Take one teaspoon two times every day, with your dinners for 21 days. Following 21 days you will see the distinction in your waistline.

 Why this fat consuming beverage works?

1. Horseradish for getting in shape

Horseradish has particular properties that assistance separate greasy sustenances and assist assimilation. It is pressed with multivitamins C, B1, B6, B2, potassium, press, calcium, magnesium, and phosphorus.

2. Ginger for weight reduction

Ginger has been referred to for quite a while as an impetus in assimilation It disposes of swelling, gas, stoppage and acid reflux. Consequently helps in shedding pounds rapidly.

3. Lemons for fat misfortune

Vitamin C in Lemons is utilized to soften muscle to fat ratio while keeping hungr under control level. Lemon is known for its detoxifying properties which help in evacuating substantially squander. High dosage of vitamin C in lemons isn’t just useful in consuming fat it additionally reinforces Immune framework.

4. Cinnamon for shedding overabundance weight

Cinnamon targets stomach fat which is the hardest to free particularly for ladies. It controls glucose levels which take out develop of abundance fat in the body.

Your Body Fat Will Remove In 3 Days With The Help Of This Recipe, Result Will Be Awesome

Your Body Fat Will Remove In 3 Days With The Help Of This Recipe, Result Will Be Awesome.

Heavy weight or Fat in Body is problem found everywhere in this world. Do not worry, you do not have to work so hard anymore because I have the right recipe for you, it will burn all your body fat quickly and also make sure to prevent you from regaining the weight you lose. There are many recipes on the web that promise to help you lose weight, but the only thing that happens is the ingredients and the recipe.


And after that, you do not know why you’re losing weight and how you can avoid regaining weight after you stop drinking all the detox teas they teach you. Today I will share a recipe that will help you lose weight very fast, but before going deeper into this, I feel that I must tell you all the benefits that can be attained by consuming this marvelous drink.

So here is the marvelous recipe

Basically, This recipe is made by a combination of thermogenic foods. If you still do not know what that means, I’ll explain it in the easiest way. Thermogenic foods just have the ability to make your metabolism run faster and also make the fat burn faster.

Before jumping straight to the recipe, let me explain why this recipe is so good for losing weight. In addition, this recipe also:

Suppresses the appetite and makes you feel fuller.
Increase body heat, speed up metabolism.
It helps fight against inflammation and reduce the levels of harmful fats in the blood.
Inhibits the fat accumulation in the body and promotes the weight loss.
It regulates the insulin production as well as decreases the metabolism of glucose, and also manages to avoide the storage of localized fat.

Lose Weight In 3 Days

Ingredients:

  • Two tablespoons of cinnamon or 4 medium sticks
  • One ginger root (about 3 or 4 inches)
  • 1 liter of water
  • One teaspoon of honey


You should drink this in the morning on an empty stomach and wait 30 minutes before you start eating. Also take it at night before going to sleep to burn all the fat you stored during the day, in addition, drinking this drink at night will avoid the craving for food at night, which is one of the main reasons why many people They store fat.

Source =”naturallymedication.com/doctors-are-speechless-this-recipe-will-help-you-lose-all-of-your-body-fat-in-3-days/”

THE BEST HOME MICRODERMABRASION: REMOVES SPOTS, WRINKLES, SCARS AND ACNE AFTER THE FIRST USE!

In those cases, people are advised to turn to natural products and start using them. If you want to get rid of your skin scars, wrinkles, blemishes and acne without spending a lot of money on medications and cosmetics, you must try this incredible and very easy homemade treatment! It’s for microdermabrasion and works almost instantly!


The preparation of this treatment demands only 2 ingredients:

-olive oil and baking soda! Yes, it’s that easy!

Before you begin with this treatment you need to know that baking soda will remove all of your skin problems very quickly. It has helped many people to correct their scars and acne problems.

Olive oil, on the other hand, is a skin friendly oil. It possesses many natural antioxidant, anti – inflammatory, soothing and moisturizing properties. This makes us easily conclude that by mixing baking soda with olive oil, you will be able to prepare an amazing mixture that will assist you to remove the dead skin cells on your skin pores!

Recipe for this amazing microdermabrasion:

Ingredients for microdermabrasion:

  • Baking soda
  • Olive oil
  • Lukewarm water


Preparation:

-Take some baking soda and put it in a bowl.

-Put the adequate amount of olive oil in the same bowl.

-Then, mix these two ingredients until you get a fine paste.

-After you get a homogenous mixture, apply it on the dried acne scars and massage the skin for about 5-7 minutes.

-Make sure that you cover all the acne scars on the skin.

-At the end all, wash off the mixture with lukewarm water.

-This method will help you clear all the acne scars on your skin.

Remember to apply it regularly if you want the best results!

Monday, July 16, 2018

2 TABLESPOONS A DAY AND GOODBYE BELLY FAT. THIS DRINK WILL BURNS STOMACH FAT IMMEDIATELY!!!

The extra stubborn fat around the stomach is almost usually a result of the lazy bowel syndrome. Fatty deposits build up in the stomach and slow down the detoxification of the body. Therefore, nutritionists suggest a drink that should be solution to this problem.


WEIGHT LOSS DRINK 

Ingredients

  • 125 g of horseradish
  • 3 lemons (before use, place them in a container filled with water and a tablespoon of vinegar for 10 minutes to wash away pesticides)
  • 3 tablespoons honey

Procedure:

In a blender add 125 grams of horseradish and blend it well. Cut the lemons (unpeeled), remove the seeds, and add them in the blender. Mix everything together until you get a smooth consistency. Then, add three tablespoons of honey and mix everything well.
Keep this drink in a sealed jar in the fridge.

Dosage:

Take one teaspoon of this balm twice a day with meals for 3 weeks.

Why is horseradish good for the health and his health benefits? 

Horseradish roots and leaves have been well known to bring health benefits for hundreds of years. Horseradish contains more than 10-fold higher glucosinolates than broccoli, so you do not need much horseradish to benefit. In fact, a little dab on your steak will go a long way to providing important health benefits.

The glucosinolates in the horseradish have the potential to increase human resistance to cancer and environmental toxins. They have powerful antioxidant properties and can also be used to relieve sinus and respiratory distress. Glucosinolates also act as natural antibiotics against different types of infections because of their known toxicity to specific bacteria and fungi, as well as their ability to increase blood flow to the infected area and more rapidly remove the waste products from that region of the body.

Why is lemon good for the health and his health benefits?

Lemons are acidic to the taste, but are alkaline forming in the body. In fact, they are one of the most alkaline forming foods that make them great for balancing a highly acidic condition in the body. Lemons are a favorite all over the world and an essential food in kitchens around the world. The lemon is a wonderful stimulant to the liver and is a dissolvent of uric acid and other poisons liquefies the bile.

The lemon peel contains the potent phytonutrient tangeretin, which has been proven to be effective for brain disorders like Parkinson’s disease. Lemon is high in vitamin C and other antioxidants can help the immune system battle germs that cause a cold or flu. Maintaining a healthy diet high in fruits and vegetables is especially important during the winter months when physical activity levels tend to drop.

Why is honey good for the health and his health benefits?

Honey is a sweet liquid produced by honey bees using nectar from flowers through a process of regurgitation and evaporation. Honey contains flavonoids, antioxidants which help reduce the risk of some cancers and heart disease. Recent research shows that honey treatment may help disorders such as ulcers and bacterial gastroenteritis. Honey helps with coughs, particularly buckwheat honey. In a study of 110 children, a single dose of buckwheat honey was just as effective as a single dose of dextromethorphan in relieving nocturnal cough and allowing proper sleep.

Source

A GARLIC CLOVE IN THE MORNING ON AN EMPTY STOMACH. THE RESULTS ARE SURPRISING!

Garlic is a condiment with many virtues. It can help you to remedy several health problems and prevent serious diseases like cancer. Find out what happens to your body when you eat a clove of garlic on an empty stomach.

The benefits of eating garlic on an empty stomach

For over 5,000 years, garlic is praises for its medicinal benefits, it is a powerful antioxidant that has antibacterial, antiviral and antiseptic. It is very effective for treating disorders such ascolds or flu.

It is also rich in vitamins (A, C, B6, B9, E) and minerals (zinc, calcium, phosphorus, potassium …) that help strengthen the immune system, improve blood circulation, prevent and treat bacterial infections.


Garlic against cancer

Moreover, its richness in antioxidants helps protect healthy cells of the body and prevent serious disorders such as cancer. Researchers from the National Cancer Institute studied the case of Chinese who ate garlic every day, they found that this habit reduces the risk of gastric cancer and esophageal cancer. They also observed that consumption 10g per day of vegetables from the allium family (onions, garlic …) reduced the risk of prostate cancer by 50%.

Garlic against cholesterol

This ingredient is also beneficial for the heart, prevents blood pressure, cleans the blood vessels and improves blood circulation. According to the American Heart Association (AHA), it is advisable to regularly eat garlic because of its ability to prevent cardiovascular disease. a study at the University of Pennsylvania showed that daily consumption of garlic reduced cholesterol by 7%. This ingredient contains a compound called allicin, which gives garlic its odor to which, when consumed raw, blocks the chemical synthesis of cholesterol in the blood and prevents it from building up on artery walls.

Garlic: to eat cooked or raw?

Depending on the mode and the cooking time, the key compound in garlic, allicin, can have no effect on the body. Its properties can be deactivated by heat, and the amount of antioxidants decreases.

By eating raw garlic, you take full advantage of its benefits. But if you want to eat it cooked, wait at least 20 minutes before the end of cooking to add in order not to lose its active compounds.

If the idea of eating garlic on an empty stomach is not for you, you can add it to your daily dishes to enjoy its benefits and promote the proper functioning of the body. However, it is advisable to moderate consumption (1 to 4 cloves per day) as this may cause diarrhea and other side effects.

Different uses of garlic

Against a cold or bronchitis

To treat a cold or bronchitis, prepare a thyme herbal tea and garlic cut into pieces. To sweeten the mix, add pure honey. However, do not forget to remove the seeds before cutting garlic.

Detofixier to the body

The toxins are harmful to health, they promote disease, aging of the skin and dull the complexion. According to Chinese medicine, garlic cleans the blood of accumulated toxins, stimulates the kidneys and prevents urinary tract infections. And feel free to add to your daily meals.

Treat ear inflammations

Crush a clove of garlic and mix with a tablespoon of olive oil. Let the mixture sit for an hour and apply a few drops of this oil in the infected ear. Repeat this twice a day until the inflammation disappears. The antibacterial properties of garlic will relieve inflammation.

Prevent hair loss

To strengthen your hair, crush 5 cloves of garlic and add 50 ml of olive oil. Massage your scalp well and let stand for a few hours. You can sleep with the mask if you want, it will nourish, moisturize your scalp thoroughly and prevent hair fall.

Reduce itching feet

Heat the water, pour it into a bowl and discard two cloves of garlic. Wait until the temperature is pleasant before soaking your feet, let stand 20 to 30 minutes. Repeat the process several times a week to notice results. The antibacterial properties of garlic will treat itching and prevent the development of fungi.

Source

DRINK THIS TO CLEAN YOUR LIVER AND LOSE WEIGHT IN 72 HOURS

Make this powerful drink for liver cleaning and get rid of extra weight without too much effort.


When the organism if full of toxins, the liver can’t perform its functions normally. In this case the process of losing weight is significantly slower and you gain more and more weight.

People don’t consider that the liver is probably the most important factor which decides if you are going to lose weight or that process will be stopped without any results for long time.

That is the reason why people don’t lose weight despite their great effort and different methods.

If you are one of them who want to lose weight then try this recipe and detox your liver entirely.

Consume it for 3 days and clean your liver from any toxins and filth which live inside.

How it is used?

Consume this drink 3 times a day during 3 days. Avoid heavy meals during these 3 days. Eat healthy food in order to ease the process of detoxification of the liver and lose some weight.

Ingredients:

  • 3 lemons
  • 1 cup of cut parsley
  • 5 steams celery
  • 6 cups water

Instructions:

Put in blender the lemon juice, parsley and celery and mix it, then add water and mix again. Consume 2 glasses, 3 times a day on empty stomach. Repeat the procedure in the next 2 days. Than make a break for 7-10 days and then repeat the treatment.

Source: 1

DRINK ONE GLASS OF RICE WATER AND SEE WHAT WILL HAPPEN TO YOUR BODY – YOU WILL BE AMAZED!

I don’t really think that someone drinks the rice water after we cook our rice. Well, this is probably because we didn’t know that this rice water is loaded with healthy nutrients and it can provide many health benefits for us and our health in general. Just a single cup of rice water a week can improve your health on so many levels.


In this article we are going to show you why you should waste this rice water and why you should drink it:

It is a good source of energy
Rice water is loaded with carbohydrates, which means that it will provide a lot of energy for the entire day. The human body needs carbohydrates for energy, so a glass of rice water in the morning is the best wat to start your day. You should also drink rice water when you feel tired or lack of energy.

It prevents constipation
You should also know that rice water is rich in fiber, which means that it’s very useful and beneficial for regular bowel movements. The starch in the rice water motivates the development of useful bacteria in the stomach.

Prevents dehydration
During the hot summer days, we lose a lot of water through sweating and rice water is perfect to prevent dehydration and loss of nutrients. This is why you should drink rice water, especially in the summer.

Effectively treats symptoms of viral infections
You should also know that rice water is often used as a natural remedy for fever, because it restores lost nutrients and loss of fluids. The rice water will accelerate the healing process and the patient will recover much faster.

Rice water relieves symptoms of diarrhea
Rice water turns out to be an amazing home solution for treating diarrhea.  You should also know that it’s completely safe for children, even newborns, who are more susceptible to stomach discomforts.  A recent study has found that rice water can effectively relieve the symptoms of diarrhea in infants

Prevents Cancer
You should also know that if you drink rice water more often, your organism will be much more powerful to fight against many ailments – even cancer. This means that rice water can prevent cancer.

Prevents Alzheimer
A recent study has found that drinking cooked rice water can prevent the occurrence of Alzheimer’s disease. This is also one of the other great advantages of drinking cooked rice water.

Protection from Sun
Rice water contains high amounts of the compound – oryzanol. This powerful substance prevents the harmful UV beams from the sun. Use rice water to offer your skin some assistance with taking the sun’s heat.

How to make rice water:
You just have to follow the simple instructions. Here’s what you need to do – you just have to boil the rice in some fresh water. After it’s cooked well, strain the water in a separate container. Enjoy your rice water. We really hope you find this article helpful and don’t forget to share it with your friends and family. Thank You.

Source

ADD 1 TEASPOON OF THIS MIXTURE TO YOUR COFFEE TO BOOST WEIGHT LOSS!

Not only is a fresh cup of coffee a warm and delicious drink in the morning, it also boasts multiple health benefits. The caffeine in coffee can kick-start your metabolism in the morning, and drinking it in moderation can promote a healthy heart and protect against several illnesses.


If you love your morning cup of joe and you happen to be trying to lose a few extra pounds, you’re in luck. Adding just a few simple ingredients into your routine cup of coffee will help accelerate your metabolism, burn more calories and melt away stubborn fat that your body just can’t seem to get rid of. All you’ll need is some cinnamon, coconut oil, and honey. You can also add some cocoa if you’d like! Here’s why it works:

Cinnamon:

Cinnamon has been known for its powerful medicinal properties for centuries. It’s loaded with antioxidants and anti-inflammatory properties that help fight infections and inflammation in the body. It also reduces blood sugar levels in the body to keep you feeling full longer, aiding in the weight loss process. Cinnamon is believed to increase blood sugar metabolism to break down sugar for energy, allowing less fatty acids to be stored in the body. There are two types of cinnamon: Cassia and Ceylon. Ceylon is known as “true cinnamon,” and it’s believed to be more beneficial, so stick to Ceylon!

Coconut Oil:

Coconut oil is a fat, but it’s a healthy fat! While most fats contain long-chain fatty acids, coconut oil consists almost entirely of medium-chain fatty acids which metabolize differently. They are sent straight to the liver from the digestive tract, where they are either used for energy right away or turned into ketone bodies, instead of being stored in the body as fat. Coconut oil is a natural thermogenic, so it increases both metabolism and energy expenditure, resulting in more efficient fat burning!

Honey:

Yes, honey contains sugar. Usually, in order to digest sugar, the body uses stored vitamins and minerals that are essential to dissolving fats, reducing the amount of vitamins and minerals in the body. Honey actually contains nutrients, including iron, sodium, potassium, phosphorus, zinc and calcium, so the digestion process is balanced between the sugar and nutrients.

Honey is also a good source of vitamins, including folate, niacin, riboflavin, Vitamin C and Vitamin B6. Research has shown that honey can increase levels of good cholesterol in the body, reducing stress on the heart and allowing people to lead a more active and healthy life to further promote weight loss. You’ll want to use raw, unfiltered, unpasteurized organic honey for the best results.

Ingredients:

  • 1 teaspoon of cinnamon
  • 3/4 cup of coconut oil
  • 1/2 cup of raw honey


Directions:

Mix all ingredients together until you get a smooth mixture.
Store it in a cup and cover it.

To Use:

When you pour yourself a fresh cup of coffee in the morning, add 1-2 teaspoons of the prepared mix to your coffee while it’s still hot.
Stir and drink!

Source: 1

Sunday, July 15, 2018

THIS AROMATIC DRINK WILL RID YOU OF THAT DROOPING BELLY!

Abdominal or belly fat is not only unsightly but also increases the risk of health hazards including blood pressure, diabetes, and dementia, even at an early age. Some common causes of belly fat are stress, alcoholism, lack of physical activity, menopause, unhealthy eating habits, improper digestion, slow metabolic rate and genetics.


There are numerous fat burning foods and spices that can help you lose your belly fat.

This easy home remedy will help you get rid of that unwanted belly fat.  Whether you are a female or male, this home and herbal beverage will certainly work for you.

You need only these ingredients: 

  • ½ – 1 tablespoon of turmeric powder
  • ½ – 1tablespoon of ginger powder
  • ½ a teaspoon of cayenne pepper
  • 5 tablespoons of lemon juice
  • 1 tablespoon of stevia
  • 1 liter of water

Preparation:

Put the water on a stove. When it starts boiling, put it aside and let it cool for 5 minutes. In the meantime take a pitcher and put all the ingredients in it. Pour the water over them and stir well. Drink this beverage during the day, as long as you find it necessary. Expect the first results in 10 days!

(Source: homehealthyrecipes.com)

GOT HIGH BLOOD PRESSURE? TRY THIS 2-INGREDIENT TEA!

Blood pressure is defined as an amount of strength that pushes against the walls of arteries to get blood through the body. If this strength is too strong for too long, it will weaken arterial walls over time.


In America, 70 million people (or 1 of every 3) have high blood pressure. In Canada, it’s 1 in 6.

Hypertension increases the risk of heart disease, stroke, atherosclerosis, and kidney failure. Managing this condition is, therefore, critical not just for all-around health and feeling good, but to prevent life-threatening illness.

Medications increase the risk of cancer

According to studies, taking the most commonly prescribed medications – calcium channel blockers (Amlodipine, Verapamil, Diltiazem) – for an extended period puts you at risk of developing cancer 2 and a half times that of someone who doesn’t and the odds increase as you age.

Two types of hypertension

Hypertension can be genetic or acquired through a high-risk lifestyle. There are 2 types of hypertension essential (primary) and secondary. In the case of essential hypertension, there’s no possible cause and it gradually develops over many years. Secondary hypertension is usually connected with other conditions such as:

  • Kidney problems
  • Thyroid problems
  • Obstructive sleep apnea
  • Adrenal gland tumors
  • Certain congenital blood defects

The risk factors for high blood pressure include:

Age
Excessive use of alcohol or drugs of any kind
Overweight
Race – high blood pressure is more common in African Americans than white Americans
Sedentary lifestyle
Stress
Tobacco use
Chronic vitamin D and/or potassium deficiency over time
Too much salt
Other chronic conditions such as diabetes and kidney disease
Medications for high blood pressure can kill you faster than hypertension itself, so what can you do?

There is a lot you can do!

How to manage high blood pressure

According to many studies, high intake of fruits and vegetables reduce the risk of heart disease with demonstrated anti-inflammatory effects due to the group of phytonutrients known as anthocyanins.

In order to manage high blood pressure:

Reduce your salt intake: Reduced salt intake can delay or prevent the incidence of antihypertensive therapy, can promote blood pressure reduction, and may represent a simple cost-saving mediator to reduce cardiovascular morbidity and mortality.

Exercise: Exercise is a foundation therapy for the prevention, treatment, and control of hypertension.

Avoid foods that worsen hypertension, like alcohol, processed meats, ramen noodles, and anything with high sodium content.

Below is a recipe for hypertension tea that is delicious and will provide nutrients to reduce blood pressure.

Celery contains phthalides, phytonutrients that act to reduce constriction in artery walls, allowing increased blood flow.

Red dates contain high levels of potassium, a nutrient known to lessen the effects of sodium in the bloodstream, thereby reducing blood pressure.

2 – Ingredient Tea

Ingredients:

7 ounces of organic celery
2 ounces red dates
2 quarters water
Instructions:

Wash and clean celery and red dates.
Cut celery into small sections.
Put all ingredients in a soup pot and simmer for 30 minutes.
Strain the chunks from the liquid.
Drink the tea as often as possible.

8 Best Exercises For Women’s Health Over 40

Many people tend to get less active as they get older which is exactly the opposite of what experts recommend. As your body ages you need to be taking extra care of it by working out sensibly and keeping it in tip-top form. This will not only keep you looking and feeling younger but it will help to prevent all kinds of diseases, aches and pains.


Do you want to be hunched over with a bad back and a walking stick aged 70? No, we don’t either! We’ve compiled a list of the 8 exercises that are specifically designed for over 40s that will have you skipping into old age stronger and fitter than you were in your 20s.

SLEEP
It’s not technically and ‘exercise’ but it is one of the most important part of any workout routine! Without adequate sleep your body can’t repair the muscles that you’ve been working out at the gym, which means that all your hard work is for nothing. Sleep deprivation leads to grouchiness and lethargy, which means lack of motivation to even get down to the gym in the first place. What’s more, studies have shown that individuals that don’t get enough sleep are more likely to look for energy from extra calories. So make sure you are getting enough shut eye to be on form and focused every day.

T-TO-Y ARM RAISES
This is a simple but incredibly effective exercise that you can add to your routine. Hold your arms out to the side in a T shape and raise them to the count of three up to a Y shape, then lower back down. If you find this too easy pick up some weights – anything will do, even a can of beans or a water bottle. Try increasing the weight as the exercise becomes easier. This nifty exercise works your back, shoulders and arms which are key areas of concern as you get older. Studies have shown that poor posture disproportionately affects the older generation and this is due in large part to muscle weakness in the upper back and shoulders.

WALKING BACKWARDS
This one takes a bit of getting used to but it will work wonders for your core strength and balance. We’re not asking you to walk miles and miles backwards but incorporating 10 backwards steps every few minutes when you are out walking will make a big difference in the long term. Not only is it good for your balance and coordination but it works the two major muscles in your calves and works on the tendons in your lower leg.

WALKING (FORWARDS!)
Walking is one of the great simple (and free) pleasures of life, and luckily it’s a great way to lose weight and stay fit. In today’s climate of super faced paced living people feel like they don’t have time to go for a walk and enjoy the process of travelling through their environment.

For retirees though, that’s not usually an issue. Walking just 40 minutes at a comfortable pace will burn 160 calories and walking 3 miles will burn just as many as running the same distance. So you don’t need to be a Speedy Gonzales to reap the benefits of this exercise!

ONE LEGGED SQUAT
One legged squats require good balance and stability, particularly in the core, hip and shoulder. So they are a great exercise for older people that want to maintain good overall form and are looking for an exercise that they can build up to.

If you can’t squat one-legged already, you can easily start with a simple sumo squat: with your feet hip-width apart slowly bend the knees until you thighs are at a 90 degree angle with the floor. Make sure your knee doesn’t come past your toes and that you keep a nice strong back and shoulder with your core engaged. From here you can build up the strength to do a one legged squat – keep one leg grounded while the other in extended out in front of you.

ROWING MACHINE
As you age, a key focus point should always be your shoulder joints and upper back. If you keep these strong then you’ll be able to maintain a good posture and you’ll avoid the painful back problems that often plague older people.

Rowing machines in gyms are a great way to work your muscles and get a cardio workout at the same time, so you’ll be burning calories, building strength and getting fitter all in one go. If you don’t have a gym membership then why not get outdoors and try out the real thing? Regular outdoor activities have been shown to reduce stress levels and lower blood pressure, reducing the risk of heart-related illnesses.

SINGLE LEG DEADLIFT
Single leg deadlifts work much like the single legged squat in that they focus on your balance, coordination and stability. It’s also a great exercise for that key area the back and shoulders.

Choose a weight that fits your ability – you should be able to do three sets of 8-12 reps, with the last few reps being a struggle (without compromising form!). Hold your weights in each hand with your arms by your sides. Now, standing with feet hip-width apart, raise one leg off the ground behind you, then lower your upper body by bending at the hip and keeping a flat back.

7 Minute Butt & Thigh Workout With no Equipment


You can not hide a flat ass in a swimsuit. The beach season is a hard time for saggy buttocks! Get ready for the summer vacations with our training program. If you regularly visited the gym at winter, preparing hard for the summer, it is the time to show the results of your efforts now!

1. Chair Kickback

You can use a chair or even a bed to support your upper body while doing this move.


How to do it

  • Stand about 2 feet away from a bench or edge of a bed.
  • Keep your thighs and feet close together.
  • Lean forward to the supporting object and hold firmly with both hands.
  • Your torso should be parallel to the ground.
  • Now you’re going to lift your left leg backwards until it’s parallel to the ground.
  • Hold the position for 1 second and return to the starting point then do the other leg.


2. Squat Pulse


Starting in a standing position go down into a squat position — think weight should be shifted back on your heels, knees NOT over your toes, and your chest tall. Pulse out three squats, going up and down by just a few inches. After three, go straight from a squat position and power through jumping into the air as high as you can go.

3. Squat Kick 


Hamstring toner and booty lifter! Make sure to alternate legs. Flex your feet.

4. Squat


Squat Side Kicks – Start with your feet slightly wider that hip width, and slowly lower your body into a traditional squat position. As you reach the lowest point of the squat, raise your left knee and quickly kick your leg to the left, like a karate kick. Keep your right leg stable, and return your left leg to the floor before coming out of the squat. Alternate between sides.

5. Lunge Pulse 


f you’re able to keep going without taking a pause… after your last lunge squat you’re going to hold the position and transition to…

DIY Apple Cider Vinegar Detox Drink Recipe ( Honey, Cinnamon, and Lemon) for Fat Burning – Drink this Early in the Morning and Before Going to Bed at Night

Do you really want to detox your body from toxic substances and lose some fat? If so then this apple cider vinegar detox drink is for you.
Apple cider vinegar (ACV) is well known for its antioxidant and revitalizing properties. It is good forweight loss, lowers blood sugar and improves symptoms of diabetes.

Vinegar with acetic acid as active ingredient helps kill bad gut bacteria in your system.  It also helps to improve the digestion of protein that activates the stimulation of growth hormone which helps in breaking down of fat cells.

Lemon is another natural ingredient in this powerful detox drink. Lemon is loaded with vitamin c, an effective antioxidant, which helps in the detoxification process and boost immunes system.

One of the active ingredients in lemon is citric acid, which assists in improving kidney health and alleviating the risk of developing kidney stones. Lemon also regulates the pH level in your system and makes you less risk of heart attack and stroke.

Why do we include honey in this apple cider vinegar detox drink? Ho, I love honey! Not just because of its sweets but because it improves gastrointestinal disorders. Also, it is a powerful antibacterial and antifungal.

Additionally, it is scientifically proved that honey improves athletic performance by maintaining glycogen level.

How is cinnamon good for you?  According to a recent research, it was discovered that cassia cinnamon can lower blood sugar and cholesterol in the body system of people with type 2 diabetes.

They also claimed that cinnamon is a powerful natural remedy to fight free radicals and prevent cell damage to the body


Apple Cider Vinegar Detox Drink Recipe

Ingredients:

  • ACV – 2 tsp.
  • Lemon juice – 2 tbsp
  • Raw honey– 1 tsp
  • Ground cinnamon- 1 tsp
  • Water – 1 cup of hot water

Directions

Add fresh lemon, apple cider vinegar, raw honey and powder cinnamon in one cup of hot water.
Then start stirring them. And make sure you stir them very well because these ingredients, especially cinnamon tends to settle to the bottom of the cup. Take apple cider detox drink every morning before you eat to flush out toxins and get rid of excess fat.

If you love this drink, share it!!